I totally like it… I do have a question, though (as I’m not quite familiar with how to add icons to my editing bar… you have a drop-down for “Insert”, and it has the “horizontal line” clicker/button that used to show up automatically… how can I add that into the buttons so I don’t have to continue clicking INSERT?
Hi Dick,
I split your post off into a dedicated thread and will make a sort of respon-torial in reply. Thanks for upgrading to the current version. Let me know how you get on with it.
Admin
Dashboard > Settings > Enriched Editor
Getting Started
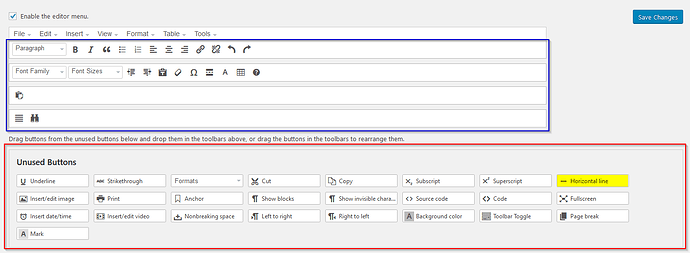
The following screenshot depicts the important parts of the Enriched Editor admin screen. The blue outline shows which controls are currently available in your editor – you can drag, drop, and reorder the items to your liking. If you don’t need certain items, drag them down into the Unused Buttons section (outlined in red) and drop them off there. You can drag items back and forth between the two sections until you have exactly the controls you want, and in exactly your perfect order. Once you’re happy with the interface, click to save your settings. Note that these outlines are in the screenshots only, not in the actual admin page.
Regarding the Insert menu that you asked about:
The very top row of the interface can optionally show the “editor menu” – this is the menu that contains: File, Edit, Insert, etc… This menu takes up the full row, displays at the top of the editor, and is not responsive to drag/drop. It provides a bunch of drop-down options in the editor and can be enabled/disabled via the checkbox (just above the blue outline.) This menu presumes that you will not also want those same items taking up space in the rows, which is why you found that the Horizontal Line button had been removed. No worries. You can add it back.
Add a Button to the Interface
Find, for example, the Horizontal Line button in the Unused Buttons section, highlighted in yellow in the screenshot. Drag it into the editor wherever you would like it to appear and drop it there. Click to Save Changes. That’s it.
Special Case
There is one special case to be aware of. The Toggle Toolbar button can only be placed in the first row. This is because the first row is the only logical placement for it - if it went into any other row, clicking it would effectively remove it from view and you’d have no way to get it back.
SUPER - I already moved the horizontal line where I needed it… thanks for the great explanation… I’m already in LOVE with this plugin!!!
Glad to hear it. ![]() Would you mind if I quoted you for the “What people are saying about this plugin…” section on my site, like what I’ve done here?
Would you mind if I quoted you for the “What people are saying about this plugin…” section on my site, like what I’ve done here?
I wouldn’t mind in the least… have at it… it would be nice to have a link to my site included, too… https://contemporaryfusionreviews.com
What, you want a link, too?! Jeez!
Hahaha… of course! All the comments have a linkback. …and they’re even attributed as followable. ![]()
This topic was automatically closed 2 days after the last reply. New replies are no longer allowed.
